Showing posts with label fermented food. Show all posts

Milk Kefir: An Easy Way to Reintroduce Dairy

Milk Kefir: An Easy Way to Reintroduce Dairy after a decade of veganism 

I created this recipe to eliminate guesswork and prevent common fermenting headaches for someone preferring a small or controlled amount of kefir. 

Fermenting powdered milk is unusual. However, powdered milk solves a major practical challenge associated with fresh store-bought milk, the usual kefir milk source: if you only drink a small daily portion of kefir, buying whole cartons of liquid milk frequently leads to waste as the milk spoils before you can use it all up. 

Furthermore, when reconstituting powdered milk for kefir, guessing the proportions often leads to a mix that is either too watery or overly dense—both of which can cause frustrating, often undesirable outcomes.  Consequently, this recipe uses precise weights to give you total control over how much you prepare each day. By taking out the guesswork and preventing waste, these exact measurements are here to protect beginners from common setup pitfalls and guarantee a smooth, hassle-free process every single time.


What Is Milk Kefir?

Milk kefir is a fermented milk drink made by combining milk with kefir grains—living cultures of bacteria and yeasts that ferment the milk. During fermentation, the microorganisms consume much of the lactose, producing a tangy, slightly thickened drink with a distinctive fermented flavour.


After being vegan for more than 10 years, I decided to become vegetarian, with milk and eggs as the only animal products I chose to add back into my diet. One of my main reasons was bone health. I wanted an easier way to obtain nutrients associated with bone health, including calcium and vitamin D when the milk is fortified. Fermenting the milk also made it much easier for me to digest after so many years without dairy because fermentation reduces some of the lactose.


Uses and Benefits of milk kefir 

- Bone health: Provides calcium and protein, with fortified milk also providing vitamin D.

- Easier digestion: Fermentation substantially reduces lactose compared with ordinary milk, making kefir easier for some people to tolerate.

- Live cultures: Milk kefir contains a diverse community of live microorganisms produced by the kefir grains.

- Nutrient-rich: Provides protein, calcium and other nutrients naturally present in milk.

- Convenient: It can be consumed on its own or incorporated into smoothies, breakfast foods and other recipes.

- A practical transition from veganism: For me, kefir provided a relatively gentle way to reintroduce dairy while maintaining a predominantly plant-based vegetarian diet.


My Milk Kefir Recipe with full cream powdered milk 

Specialized equipment needs: a glass jar with a lid for fermentation; a bowl into which the jar can fit; measuring scale (or measuring cups)

Full-cream powdered milk. I use full-cream powdered milk rather than fresh milk because it allows me to prepare exactly the quantity I need without worrying about fresh milk becoming too old.


My kefir grains-to-milk ratio is approximately 

  • 1 part kefir grains to 15.5 parts liquid milk.


For each person, I found that my ideal daily quantity was as follows. Feel free to scale the weights:

- 32 g (roughly 1/4 cup) kefir grains (1 part)

- 500 g prepared liquid milk at room temperature (15.5 parts)


To make the 500 g of liquid milk, I use:

- 440 g  (roughly just under 2 cups) chlorine-free room temperature water (88%)

- 60 g  (roughly 1/2 cup) full-cream powdered milk (12%)

Image of the milk kefir recipe on kitchen tiles m


I mix the water and milk powder thoroughly, add the kefir grains, and allow the mixture to ferment in a glass jar on my countertop for approximately 24 hours. To keep out ants, I place the jar inside a moat made of a bowl of water. I place the lid loosely on top to protect the kefir from dust or flies while allowing air bubbles to safely escape without breaking the glass.

After fermentation, I separate the kefir grains from the finished kefir and use the fermented milk as my daily serving.

Every day, I consume the small excess of kefir grains as a consequence of ongoing fermentation related growth of the grains. This small amount of grains go well in cereal or smoothies.

This approach gives me a convenient, consistent quantity of fermented milk while allowing me to control exactly how much milk I prepare.


CONTENT RELATED

Vegan Ceviche

I really enjoy ceviche. However, I wanted a vegan option based on the standard fermented vegetables recipe. Rather than use lots of salt and lemon as per the regular fish ceviche recipe, my vegan version will allow the salt and souring of the brine to deliver those same properties of saltiness and acidity.

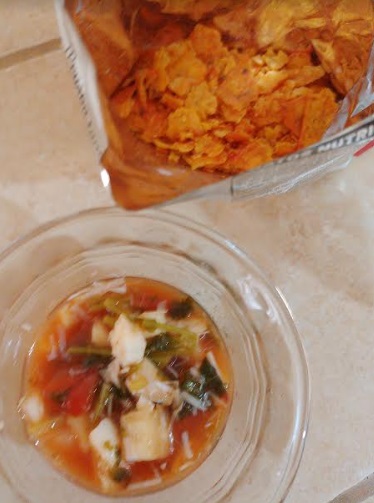
In some cultures, the ceviche is served with a dash of ketchup and may even be tossed into a bag of crispy tortilla chips and together called a 'caldosa'. I am not yet making crispy chips. However, since it is possible to make fermented ketchup (below), I was also keen to create my own. BTW, I was unsuccessful in preventing my ketchup from molding. However, the recipe rendered fantastic results that can likely be refrigerated with better success.

Fermented vegan ceviche with DIY fermented ketchup


Fermented vegan ceviche with DIY fermented ketchup and bag of spicy chips

Caldosas: Fermented vegan ceviche w DIY fermented ketchup mixed into bag of spicy chips

You will need the following vegetable combination. Place it in brine and proceed as normal in my usual fermented vegetables recipe.

  • Fish substitute: Diced
    • palm hearts, fresh (source of protein) 
    • cauliflower (source of vitamins C and K)
  • Cilantro, chopped
  • red onions, chopped
  • sweet peppers, chopped
  • nori sheet, finely shredded (optional for a seafood flavor)

Optional: Fermented tomato ketchup to be added only when you will eat the ceviche. For some reason, when I try to add my ketchup to the ferment, the ferment fails.


CONTENT RELATED TO VEGAN CEVICHE


Fermented tomato ketchup recipe (loosely inspired by Mary's Nest)
  • 1.5 cups tomato paste (home made or store bought)
  • 4 tsp raw apple cider vinegar
  • 0.5 tbsp Worchestire sauce
  • sweetener: sugar (white or brown), maple syrup, etc
  • 1/4 cup extra water from fermented vegan ceviche or other vegetables -- OR -- a combination of the following
    • water, non chlorinated with
    • 4 tsp liquid fermentation starter using a well fermented liquid from water kefir, kombucha, etc
  • Optional: 
    • herbs, sea salt

Ginger bug

Ginger bug aka 'first ferment' is a fermentation starter culture. In other words, it is rich in wild bacteria and (fermentation) yeast that will help you to kickstart other fermented products like ginger ale, probiotic lemonade and other sweet fermented effervescent fresh fruit drinks (or sodas). While some people also devise ways of using the ginger bug, this post will focus on using the ginger bug in the more common way, ie as a fermentation starter that may be kept alive for up to years on end to start a wide variety of drinks.


Uses & benefits of a ginger bug
  • Rich source of lactobacilli, the health-enhancing probiotics or 'good bacteria' (like those found in yogurt) that promote the growth of healthy flora in the intestines and helps with digestion and the absorption of nutrients
  • to preserve nutrients
  • to break down nutrients into their more digestible forms

You will need:
  • pure water, non-chlorinated
  • ginger root, fresh, partly grated / finely diced / finely minced (preferably organic so you can use the skin). I hate grating foods. A manual workaround is to thinly slice the ginger, chop and then smash the slices. Works fine for me as this makes it easy for straining away the fiber afterwards. If you have organic material, wash rather than discard the skin. You can wash and scrub ginger with diluted vinegar or lemon juice without killing all of the good bacteria. However, washing them this way, along with scrubbing them will remove wax coating. 
  • sugar, white
  • transparent, wide-mouthed glass jar for fermenting and storing the ginger bug. Transparency of this primary fermentation bottle allows you the brewer to observe the ferment. The wide mouth allows the brewer to easily feed, empty and fill the jar.
  • hot water and soap to sanitize the bottle

Steps for making the ginger bug
  • Combine the following in a glass jar
    • grated ginger, 2 tbsp to 1 cup (according to your taste). You can use the skins. Set aside the remaining un-grated ginger for later. You will need to grate a little more periodically to continually feed the bug.
    • 2 tbsp white sugar 
    • 2 cups of water. 
  • Cover the jar. You need not seal the jar with an airlock. The cover really only needs to keep out dust or other contaminants. 
  • Allow to stand at room temperature and out of direct sunlight for 24 hours. (Overtime, direct sunlight can sterilize fermentations over time)
  • Every day, feed the bug by combining the following very well into the mixture. 
    • 1 tbsp grated ginger 
    • 1 tbsp grated sugar
  • Stir vigorously to oxygenate the liquid as this is useful to the yeast and to re-submerge ginger pieces that may have been pushed up to the liquid's surface.
  • Watch for signs of successful fermentation:
    • build up of gas within the mixture. This is evident through bubbles and a popping sound when uncovering a securely closed lid.
    • The mixture starts to get cloudy.
    • The mixture makes a fizzing sound
    • ginger solids settle to the bottom.
    • white yeast settles at the bottom. This is completely normal.
    • bubbles form a frothy layer on top of the bug, even without the bottle being sealed.
    • the mixture has a slight smell of yeast (somewhat like how beer smells)
  • Decide whether you will refrigerate your ginger bug or leave it at room temperature. The feeding requirements for your options are as follows
    • Refrigerated: feed once weekly
    • Room temperature: feed daily as above
  • Things you might observe.
    • GOOD / ACCEPTABLE
      • It is common for some people to see their culture turn pink. This is safe. This is possibly due to mineral contents in your fermentation. 
    • BAD SIGNS
      • the culture becomes dark and or slimy
  • You can keep the ginger bug alive for months to years on end, even after starting to use it (for fermented sweet drinks). 
    • Top up with more unchlorinated water and continue feeding the bug to populate the new volume of water
    • If you wonder whether the bug is still alive, test it by observing if a small amount can make a sweet drink (that has no other starter). If the sweet drink starts to bubble within about 24 hours, the bug is still alive.
    • If the ginger pieces begin to crowd the jar, strain off the spent ginger and then add new stock. BTW, an indicator that the ginger is very old is when it turns brown. You do not need to wait for the ginger to get brown before removing it however. The liquid alone will already have the useful bacteria.


CONTENT RELATED TO MAKING GINGER BUG

Cheong syrup

Unlike many of the other types of ferments I have featured (like sauerkraut and other types of fermented vegetables), cheong is a no-cook Korean fermented sweet syrup. Cheong uses a dry fermentation method, meaning that water is not added. Rather, as it dissolves, the sugar extracts the moisture from fresh fruits, thereby making a fruity syrup. The most common types of cheong are based on the tart flavor of berries. However, other popular surprises include the pungent flavor of onions.


Image above illustrates a ginger cheong, from start to an advanced stage.

Use(s) of cheong syrup

  • Sweetener for cereals, granola, yogurt, etc. Essentially, cheong can be used as a honey or sugar substitute.
  • Flavor to water and ice to make a drink
  • Medicinal additive in tea (as in the case of onion cheong)
  • I plan to combine it with ginger bug to make a kvass (aka a fermented soda / sweet drink)
  • Spent solids (of berries or other vegetable source) as garnishes for cocktail drinks

You will need the following to make cheong syrup:

  • Scrub materials for preparing the fruit
      • baking soda, non-chlorinated water, absorbent towel
    • Equal parts of sugar and flavor source
      • Fruit or other organic material, ideally juicy and fresh. Tart juicy fruits are generally most popular choices. Dry or dehydrated fruit are unsuitable. Leaves alone are unsuitable. However, you can use dry ingredients IF accompanied by something else that allows its moisture to extract the leaves' properties. Example(s)
        • Berries: strawberries, blue berries, etc
        • Finely sliced citrus fruits. Keep the skins for a candied orange flavor.
        • Basil leaves chopped up with mashed tomatoes
        • apples
        • pomegranate.
      • sugar, white cane sugar is typically used
    • glass fermentation jar -- OR -- firm plastic bag that you can vacuum seal (BTW, vacuum sealing cheong has been reported to accelerate the dissolution of the sugar.)
    • kitchen scale
    • Fermentation weight
    • strainer 


    Steps for making cheong syrup

    • Remove seeds from fruits. Wash and scrub the fruits and or skins in a way that maintains the good bacteria as much as possible. After dashing some baking soda over these pieces of ginger, I added only enough water that would help me to scrub the skin without dissolving the baking soda.

    • Completely dry the fruit. This is important to prevent molding.
    • Ensure the sugar will be able to easily reach and extract the natural juices. This often means rupturing fruit skins and or massaging the sugar into rougher material. Example(s)
      • Cut citrus fruits thinly. (remember to remove the ends that can be embittering to the syrup, like seeds)
      • mash berries
      • Cut onions into julien slices
      • green sour plums
    • Using equal parts by weight of fruit and sugar, pack jars to maximize fermentation and to prevent mold. The goal here is to ensure that the sugar always submerges the fruit, thereby creating a barrier from air. To this end, either; 
      • create alternate layers of the two into the jar, ensuring that the top layer is a thick layer of sugar -- OR --
      • massage the fruit with 3/4 of the sugar used in the recipe. Place that mixture into the jar and then, using the remaining sugar, create a top layer to cover this mixture.
    • Leave to stand at room temperature. Climate allowing, do this for up to 3 months. Move to refrigeration if the fermentation occurs too quickly for your liking. After 6 hours in a tropical Summer day, the pictured ginger cheong became liquified. 
    • To avoid mold; compress the fruit down at the bottom of the jar so that it remains submerged below the level of the syrup. To this end, one method may be to use a fermentation weight; mix the fruit into the developing syrup from time to time and or; put the container into the refrigerator (especially if bubbles appear, a sign of fermentation)
    • Observe the progress. If you see mold, toss the batch.


    CONTENT RELATED TO MAKING CHEONG SYRUP

    DIY wine

    While I do not drink alcohol routinely, I started to ferment my own wine at home as a spiritual practice in homage to the autumn equinox. This article explains how to prepare the wine, even with options for anyone without any special wine making equipment or ingredients.


    • Here is a comprehensive list of ingredients and equipment that you will need
    • Select or make a juice
      • Beetroot juice, strained 
        • 1 part in weight grated beetroot with skin (for tannins in the skin) to 2 parts of water. 
    • Homogenously combine sugar. Use one of the following method.
      • For a more scientific way of calculating the amount of sugar to add using specific gravity (SG), use a hydrometer. See how in this third party video. 
      • 1 part sugar to 4 parts unsweetened fruit juice. If you do not have a hydrometer, this is a rule of thumb. 
    • Optional. Measure the starting specific gravity (SG). Note the SG on the label. This will be compared with the end SG to calculate the alcoholic value.


    • Label the fermentation jug with details like the date, fruit type, starting specific gravity.
    • Optional. Add pectic enzyme to render the wine crystal clear. The enzyme consumes the pectins in juice that can make wine cloudy. The enzyme is particularly useful for full fruit juices (ie juices made with all of the fruit pulp). You can add this either at the start of end of the fermentation process. However, when adding at the start, you need to use half the amount of what you will need at the end. 
      • 0.5 tsp pectic enzyme per 1 usg of juice (if added at the start of fermentation)
      • (A natural source of pectic acid is citrus fruits and apples)
    • Optional. Add tannin. Tannins are responsible for the health benefits in wine because they contain antioxidants. Antioxidants combat free radical cell damage, thereby helping to combat cancer, heart disease and other health problems. Tannins are natural polyphenols that are typically found in plants, bark and fruit skins. This is why adding fruit skin to your must (the juice at the start of fermentation) is a good idea. The consumption experience is a dry sensation and lasting bitterness. Despite the initial turn off, people generally acquire the taste for tannins in wine. Very tannic wines can give some people headaches. However, well balanced wine avoids this problem. Highest tannin concentrations exist in #1 black tea, #2 oolong tea, #3 green tea. Other teas include hibiscus, cinnamon, mint, chamomile). 
      • tannin powder (often ground charred oak bark extract), 0.5 tsp per 1 usg of juice.
      • black tea, brewed, unflavored (as water to dilute juice). I suspect it if fine to add the tea to the pot while you simmer the juice. Experiment to establish the way you will brew your tea for a particular result. This will help to ensure consistency. A good starting pointing from which to test is a strength of 2 tea bags per gallon (ie apx 3,785g) This tea may be steeped in a cup of water in advance and then added to the fruit juice. While tannin is destroyed with heat, over half remains after cooking for periods beyond what is required for simmering the juice. (A study showed that, after cooking for 90 minutes, over 50% of tannin remained in wine.) 
    • Optional. Add acid. Acidity helps to provide a lively taste to wine and is antibacterial to keep wine safe. 
      • 0.5 tsp acid per 1 usg of juice (if added at the start of fermentation)
    • Protect the must. Cover the container to prevent contaminants or fruit flies from entering into the mixture.
      • ideally an airlock
      • loosely fitting lid
    • Optional. Add sterilizer to kill bacteria, other yeasts within the fruit and prevent mold growth. A common type is the Campden tablet which is made of potassium metabisulfite. 
    • Optional. Allow the must to stand for 24 hours. This period will give the Campden tablet to work.
    • To the mixture, add yeast. Rule of thumb rates are 0.25 tsp per 2 cups of fruit juice -- or 1g per gallon on juice.
      • wine yeast
      • Baking yeast
    • Stir the must daily with a sanitized paddle during the initial days of vigorous fermentation. Bubbles rising from within the liquid is a sign that the fermentation process is ongoing. 
    • Note the end of the 'primary fermentation' (ie initial vigorous fermentation). 
      • Use a hydrometer to see whether the fermentation has ended. See others use the hydrometer for this purpose. 
      • As a rule of thumb, this is when the bubbles slow down to the rate of a bubble every minute through a wine airlock. 
    • Rack the wine every 30 days until the wine becomes acceptably clear. Wine racking is the process of transferring wine from one container to another. The aim is to siphon the wine into a the target container to separate it from all the sediment at the bottom of the original container. The sediment is spent yeast and therefore waste. The process uses gravity as a natural 'pump'. Regarding the origin container in the above position, you can use a clamp or even clothes pin to hold the racking tube above the level of the sediment. Ensure that your racking tube in the target container should be below the liquid level. This helps to minimize the amount of oxygen you allow into the must. Accept that you will lose some volume of wine within the sediment. Do not try to save it. The yeast sediment should be discarded because, if left for too long in the wine, it can impart an undesirable flavor.
    • After racking, top up the target container with some old wine. This helps to minimize the amount of oxygen contact.
    • Optional. Filter the wine. There are several filtration methods. Regardless of your chosen method, filtration occurs at your last racking when your wine is already beginning to clear up. Clear wine allows you to read print behind a standard wine bottle. During the last racking, rack well above the sediment level. 
      • Pour bentonite mixture at the bottom of your target racking container before racking the wine. Stir the wine and bentonite daily to suspend the bentonite in the wine.  
        • 0.8 tsp bentonite clay per gallon wine. To prepare, homogenously combine the clay with water as follows. For every 1 tsp of clay, add water 0.33 cups of water. Example, if your recipe needs 2 tsp bentonite clay, you need 0.66 cups of water (ie 0.33 cups X 2)
    • Optional. Stabilize the wine and rack the wine for the last time. Potassium sorbate is commonly used. This ensure that the wine stops fermenting. After stabilizing the wine, you will be able to 'back sweeten' the wine, ie add more sweetener without fear that yeast will continue to ferment away that sweetness and explode sealed bottles. Stabilizers typically call for 0.5 tsp per gallon of wine. Add the stabilizer to the target racking container. Rack the wine into the target container and then stir. 
    • Optional. Back sweeten. The taste of a fruit becomes more evident with back sweetening.   


    CONTENT RELATED TO DIY WINE WITH BREAD YEAST

    Water Kefir

    Homemade kefir water is a good way of getting probiotics into the digestive tract.  Like yogurt, it is a fermented food. However, it surpasses yogurt in that, unlike yogurt whose culture lives in the gut for a limited time (roughly 24 hours because yogurt is food for your gut's bacteria), kefir is a colony that continues to survive in your gut and therefore offers a longer term probiotic solution (than yogurt). It is also difficult to kill. For instance, antibiotics can not kill it completely. Furthermore, kefir offers considerably more protein and beneficial bacteria than yogurt. As you will see below, water kefiir is also a cheaper long term supply of probiotics. Specifically, most people will consider it 'cheap' not only for its initial acquisition but also maintenance and consumption over years.

    This post explains how to make your own water kefir. You can either put your kefir grains under only one fermentation stage to produce the probiotics or proceed to a secondary fermentation stage to carbonate and flavor the drink.

    You will need
    • Water kefir grains, apx 0.25 cups  (ie roughly 42 g / 1.5 oz) activated grains 
    • Water: room temperature; spring or filtered, roughly 4 cups / 1 liter; free of chlorine, fluoride, distillation, reverse osmosis processing or pH alteration that remove minerals that the grains need. 
    • Food for the kefir. Like any other organism, kefir will be happy for variety. You can therefore switch types and varieties of foods from day to the next.
      • Sugar: organic white, brown (aka turbinado), unprocessed or cane, roughly 1 tbsp
      • Optional additives, added either alone or in combination: 
        • half a lemon
        • 2 - 3 oz sliced fresh ginger, boiled in the water and sugar before cooling and adding the seeds
        • a fig
        • spoon tip of molasses. Some people express preference for unsulphured low sodium molasses.
        • A dash of coconut water
        • pinch of sea salt
        • Baking soda, a pinch (apx 1/8th tsp). Baking soda provides the grains with an adequate amount of minerals for the grains to grow and remain healthy. The frequency may vary from every other to every 4th brew. Consequently, increase the frequency especially if the grains are not thriving.
        • A dash of the previous brew to act as a 'starter'
    • Fermenting Jar, able to provide airflow, roughly 4 cups / 1 liter. You may use coffee filters and rubber bands as a cover.
    • A container for the one-time fermented kefir
      • Optional, for secondary fermentation, a glass bottle with a swing top lid. These bottles are perfect for bottling kefir with fruit juice while allowing carbonation to occur.
      • For storage; 
        • any glass jar
        • a swing-top bottle that may be left open while the fermented kefir is stored in the refrigerator
    • Plastic spoon to stir
    • A paper coffee filter and rubber band. These will cover the fermenting jar while allowing the fermentation gases to escape.
    • Plastic Strainer. Avoid metal, even stainless steel strainers since some parts, like the edges may have other types of more reactive metals. Kefir should never be handled with reactive metals.
    • a funnel if you will pour the fermented kefir into a narrow mouthed bottle.
    • A cloth to cover the fermenting jar to block out the light. Alternatively, you can place the fermenting jar into a  dark cupboard.
    • A refrigerator


    • To Activate Water Kefir Grains or To Make Water Kefir (using The Primary Fermentation)
      • Combine water and sugar in the jar
      • Add the grains
      • Cover the top of the jar with a coffee filter and rubber band. This allows gases to escape during the fermentation process.
      • Leave for roughly 1 to 2 days, depending on the warmth of the fermentation environment. The warmer the environment, the earlier the fermentation process ends.
      • If you are activating dehydrated grains, do the following
        • Strain off the water (which you may consume or discard)
        • Repeat the process of introducing water and sugar to the grains and allowing to stand
        • You may taste the grains to see if the water is becoming an ideal sour taste. Dehydrated grains may take as many as 5 rounds before they work well. The grains will swell to around the size of barley.
        • The ideal is a liquid that is not sweet but sour and rich with probiotics.


  • Observe the kefir water for readiness. Fermented kefir has the following characteristics.

  • cloudy appearance
  • tart taste 
  • fizzy appearance and sensation when swallowed. Fizziness is increasingly likely with the extent to which the grains have adapted to their environment

  • Strain off the kefir grains and add them to a new batch of kefir food 

  • You can do one of 2 things with the finished kefir water 

  • Store the kefir water in the refrigerator until consumption. Place it into an uncovered swing-top bottle or regular jar. 
  • Put your finished kefir water through a second fermentation process (to add flavor, some sweetness and or carbonation.) See instructions below.

  • As an option after the brew, set aside the grains in a bowl of plain water for 20 minutes. This will help to neutralize the pH of the grains and remove any stored sugar and minerals.

  • As an option, retain some of the fermented kefir water to add to the new batch of kefir food as a 'starter'

    • To Make Carbonated Kefir (via The Second Fermentation)
      • Complete the earlier steps for fermenting kefir
      • Pour the fermented kefir water into a bottle (that has a swing-top lid) up to 80% the capacity of the bottle. You can change the proportion according to taste. NB adding juice is among the easiest ways of flavoring kefir water.
      • Top up with pure fruit juice that is a little sweet (like Ocean Spray fruit juice) until the ring in the neck of the bottle. 
      • Other ingredients include the following.
        • a strip of orange rind into the jar (alone or with the sweet fruit juice).
        • pureed or bits of fresh fruit like mangoes, berries, ginger slices and so on. In fact, kefir is ideal for preserving fresh fruits and vegetables without refrigeration.
        • dried materials like organic coffee beans, raisins, herbs, orange rinds, dried fruit and so on.
        • leaves like mint, basil, tea bags and so on
      • Allow to sit for a period that considers the temperature of the fermenting environment, the type of additive and amount of carbonation you require. Although a general rule of thumb is roughly 18 to 24 hours,  the following times are a rough guide.
        • dry fruits and citrus rinds usually require longer, roughly 1-3 days in a warm tropical environment. Taste the kefir to determine whether you need to extend this time to allow the flavor to become better infused into the kefir. 
        • Juice does not require much sitting time. Some people drink the final product immediately. Others prefer to wait. Do taste tests to decide.
        • fresh fruit should not be left for more than 18 to 24 hours 
      • Burp the bottle from time to time, ie momentarily open the bottle to release gases. Burping prevents the bottle from exploding.
      • Chill for another 12 hours in the refrigerator before drinking

    • To deactivate kefir grains for a short period (of several weeks)
      • Feed them with water
      • Leave in the refrigerator for roughly 2 weeks before repeating the process

    • To deactivate kefir grains for an extended period
      • Optional. Place in a dehydrator with a low temperature. Some people prefer skipping this step altogether and claim dehydration makes the re-activation process more difficult.
      • store in a freezer for as long as 6 to 12 months
      • label and date

    Troubleshooting
    • Separation. This occurs when fermentation extends further than normal. Do not throw away the kefir as it is still good enough to be consumed. However, it will be more sour than usual.
    • Alcohol. Alcohol is a sign of over fermentation. You can minimize the chance of producing it by reducing the fermentation time and temperature.


    CONTENT RELATED TO WATER KEFIR
    • Full body cleanse: step-by-step instructions for the tropics.
    • Acidophilus Enema recipe
    • Some readers may be happy to know that kefir is also non-GMO, gluten-free, soy free and vegan.
    • Seek professional advice before giving to young children and elderly people.