Showing posts with label DIY. Show all posts

DIY Dehymidifier: Wet Method

A dehumidifier aka damp trap is an apparatus that removes atmospheric humidity. It becomes useful when moisture can degrade or even destroy products sensitive to it (moisture). This post will discuss the wet method. Another or dry method (image below) is discussed in a separate post.

DIY Dehumidifier: Wet method
Wet method


You will need:

  • desiccant. Ones already discussed in the DIY movement and relatively easy to find include those in the list immediately below. See list of desiccants. The CaCl2 is the overall favorite for several reasons that include the fact that it is environmentally friendly and, unlike options like the silica gel, is not limited by a maximum absorption capacity. The matter related to the absorption capacity is especially important when tending to the dehumidifier is not an available option, as when freighting goods over an extended period.  
    • Calcium Chloride / CaCl2 (from hardware or home improvement stores) 
  • A container for the desiccant. Options include the following. In each case, the container should 1) have at least one hole that is sufficiently small to retain the desiccant while allowing water to drip through and 2) fit securely over another container while leaving air space between the 2 (as a catchment to collect trapped water as illustrated above by the blue water in the diagram). 
    • A bucket. 
    • The funnel shaped top of a bottle, like a Coca Cola bottle.
  • A catchment reservoir. Options include the bottom of a bottle whose top has been removed as the desiccant container or another similar container, like a (second) bucket.
  • (Optional). A utility knife, pair of scissors and or marker (to cut a straight liine through the bottle). Keep the marker's point or utility stable by anchoring it on top of several books to the height where you wish to cut the bottle. Pivot the bottle on a single axis, like its cap, while allowing the side of the bottle to keep contact with the marker or knife. 
  • Disposal. Pour the CaCl2 condensation water waste only in places where you do not want plants to grow for at least several months. 
  • Location with lingering humidity. Place the DIY dehumidifier in any space that does not experience movement. In other words, avoid door ways because they allow movement of air which prevents much moisture to settle. Instead, place the DIY dehumidifier in closed spaces like cupboards, closed small rooms or enclosed basements. 


CONTENT RELATED TO HOW TO MAKE A DIY DEHUMIDIFER

DIY Dehumidifier: Dry method
Dry Method

DIY Dehymidifier: Dry Method

A dehumidifier aka damp trap is an apparatus that removes atmospheric humidity. It becomes useful when moisture can degrade or even destroy products sensitive to it (moisture). This post will discuss the dry method. Another or wet method (image below) is discussed in a separate post.


DIY Dehumidifier: Dry method
Dry Method
 

You will need:

  • desiccant. Ones already discussed in the DIY movement and relatively easy to find include those in the list immediately below. See list of desiccants. (The CaCl2 used in the wet method is the overall favorite for several reasons that include the fact that it is environmentally friendly and, unlike options like the silica gel, is not limited by a maximum absorption capacity. The matter related to the absorption capacity is especially important when tending to the dehumidifier is not an available option, as when freighting goods over an extended period.)
    • Silica gel 
    • Cat litter made of silica gel (from pet stores). 
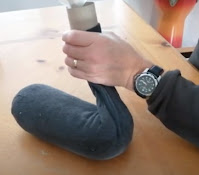
  • A porous container for the desiccant like a sock or flat hard plastic container with holes in the lid. 

  • Expiry indicator. A scale. Note the weight of the desiccant in its container. If you know its maximum capacity, routinely check its weight to know when that capacity has been reached. 
  • Heat source for recycling gel. Silica gel can be recycled by dehydrating them in the sun, on a radiator, lightly heated over or other heat source until they return to their dehydrated weight for re-use. 
  • Location with lingering humidity. Place the DIY dehumidifier in any space that does not experience movement. In other words, avoid door ways because they allow movement of air which prevents moisture to settle. Instead, place the DIY dehumidifier in closed spaces like cupboards, closed small rooms or enclosed basements. 


CONTENT RELATED TO HOW TO MAKE A DIY DEHUMIDIFER

  • A desiccant is a substance that absorbs atmospheric humidity. List of desiccants.
  • YouTuber Monkeys Uncle Dubz Club illustrates how he uses the dry method using a flat plastic tray whose lid has holes to allow the moisture to enter the trap.  
  • Read about the wet method

Homemade Vegan Chocolate Banana Icecream with 2 Ingredients

Ingredients to Make Homemade Vegan Chocolate Banana Ice-cream with 2 Ingredients

- 3 cups Ripe Bananas...
4 tbsp unsweetened Cocoa Powder
Optional): 1 tsp Cinnamon Powder, 4 tbsp nut butter, chunks of fruit (not puréed), coconut and so on.


Steps to Make Homemade Vegan Chocolate Banana Ice-cream with 2 Ingredients

1. Use only soft and ripe bananas. Peel and freeze them until solid.
2. Purée the bananas and cocoa powder in a food processor until the texture is that of a smooth soft serve ice-cream..
3. The ingredients thus far are all you need to make a basic homemade vegan chocolate ice-cream. However, if you like, add any other optional ingredients to your homemade ice-cream. In reality, this homemade vegan ice-cream will be wonderful even with only the 2 main ingredients.
4. Place your homemade vegan ice-cream into the freezer until hard. Depending on your freezer's settings, it may take about 5 hours to harden.


Other Desert Recipes to Accompany this Homemade Vegan Chocolate Banana Ice-cream


Take Control!