Showing posts with label diabetes. Show all posts

Rice Starch DIY

Uses & Benefits of Rice Starch

  • rice starch may be used in cosmetic preparations like hair shampoo, skin creams and soaps.
  • rice starch may help to control excess oil in oily skin.
  • removing the starch allows you to prepare edible rice that is more suitable for anyone concerned with reducing blood sugar levels, like diabetics.


To make rice starch, you will need the following.

  • rice, raw, organic & dry
  • water, COLD (NOT hot)*, roughly 10 times the weight of the dry rice
  • stick blender. If you use hot water or cook the rice, the non-starch parts of the rice will combine with the starch to the extent that makes it too hard to separate.
  • cheese cloth or other substitute made of cotton like a thin bandana
  • a large jug (for blending the rice and water and then for allowing the starch to settle)
  • a large 'catchment' container (to catch the strained off water and starch). I prefer a tall transparent jug. However, any large container will suffice.
  • dehumidification: 
    • dehumidifier  -- or --
    • baking sheet, good ventilation and sunlight on a dry day
  • storage container


Steps for making of Rice Starch


  1. wash rice until water rinses clean. Ex 100g rice
  2. fully immerse and soak in COLD water for roughly 45 minutes. Dry rice can be easily blended in water. However, from within roughly 20 minutes of being soaked, most types of rice begin to absorb water. This absorption helps the blending process necessary for extracting the maximum amount of starch. In fact, my first very successful attempt at this process was with rice flour that I had made previously. Soaking the flour before and after blending it endlessly likely helped considerably. Regarding the water, depending on your container, roughly 3 times the weight of the dry rice should suffice. Do NOT cook the rice or use hot water (see reason above*). Ex 300g COLD water
  3. stick blend until the water becomes milky and the rice feels like very coarse sand.
  4. Add more water (roughly 7 times the weight of the dry rice) and allow it to soak for an additional hour. Ex 700g COLD water.
  5. stick blend again until very smooth. I used the highest setting on my blender to really breakdown the rice, even when I was starting with dry rice flour.
  6. (The milky water contains the starch). Very GENTLY pass the liquid through a cloth. Stretch the cloth above the catchment container and drag a spoon back and forth as the liquid drains through the cloth. I successfully did this process with a cotton wrap, which is the same type of fabric used for making light weight bandanas or handkerchiefs. Other common types of cloth include a nut milk cloth or cheese cloth and into the catchment container. Do not wring the cloth as this is likely to rip it. I keep the cloth moderately taut by tying its ends in a knot on one side of underneath the catchment container.
  7. To maximize your starch harvest, you may add more water to the remaining rice solids in the strainer and repeat the straining process. 
  8. cover the milky water and allow starch to settle for roughly 2 hours. 
  9. Rinse the starch as many times as necessary until the water above is clear. Even though the water is very milky and opaque, you should see the starch begin to settle within a few minutes. However, ensure the water becomes clear by rinsing the starch. To rinse the starch, drain off the milky water and then stir in fresh water with the settled starch. Repeat this step until the water becomes clear. (The remaining solid rice grains can be cooked with much less water than normal and seasoned to make rice that is low carbohydrate / starch-free and therefore more suitable for diabetics than otherwise).

  10. pour off water and transfer to baking tray
  11. allow to dry slowly in a dehydrator or the sun. Beware, applying to much heat that resembles cooking can result in a gelatinous effect. Rice starch becomes irreversibly gelatinous if combined with water and heat
  12. pulverize by blending the caked starch and then sift into a storage container. The amount of starch rendered is roughly 20% of the weight of the dry rice. Ex 20g rice starch.


CONTENT RELATED TO DIY RICE STARCH

Pancreas, Insulin & Diabetes 101

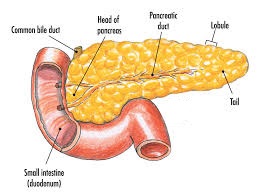
This article discusses diabetes. However, to build a knowledge base from which to understand the dysfunction, this article will first discuss the pancreatic system and its elements.

pancreas insulin diabetes


Insulin

Your body gets energy when it absorbs sugar (glucose) from carbohydrates. Although glucose is readily available in the blood, insulin acts like a key to release the glucose for the body's use. It is the hormone that allows your body to either use or store sugar. 

It is 'smart' in that it regulates your blood sugar level by preventing it from being too high (hyperglycemia) or too low (hypoglycemia)


Pancreas

The pancreas is a gland organ in the abdomen. Being part of the digestive system, it produces and secretes insulin (among other things) into the small intestines. 


Process of Sugar Absorption

Before sugar reaches the pancreatic system, the body breaks down carbohydrates into glucose which passes from the small intestines to the blood stream (a vehicular of sorts that transports it to the pancreas). 

The glucose present in the bloodstream prompts the pancreas (specifically 'beta cells' in the pancreas) to secrete insulin into the bloodstream to keep the sugar level within a healthy range. 

For this regulation process to work; cells throughout the body attract the circulating insulin and absorb the glucose (to get energy). It is useful to liken insulin to a key that unlocks the glucose.


Comparisons & Quick Contrasts Between Types 1 and 2 Diabetes
They 2 types of diabetes have several commonalities. For instance, both forms of diabetes are chronic diseases that does not regulate blood sugar levels and share contributing factors like genetic predisposition.

Additionally, if uncontrolled, both types of diabetes share similar symptoms as the following.

  • Excessive hunger
  • Excessive thirst
  • Frequent urination
  • Inexplicable weight loss
  • Fatigue
  • Weakness
  • Blurred vision
  • Difficulty for cuts and sores to heal
There is a higher incidence of diabetes among minority groups. For instance, this is most notably the case among black, Native American and Hispanic people in the United States.

As discussed in greater detail below, people with type 1 diabetes do not produce (enough) insulin. Essentially, they do not have the '(insulin) key'. Conversely, while those with type 2 diabetes have the (insulin) key, their 'key' is broken. Specifically, their bodies are resistant, ie the cells are still unable to use insulin (creating a situation that resembles type 1 in which there is no or insufficient insulin).


Type 2 diabetes is roughly 9 times more common than type 1.


Type 1 Diabetes
In type 1 diabetes, the pancreas produces little or no insulin. Consequently, with insufficient insulin in the blood, the blood sugar level is too high (hyperglycemia). Specifically, the abovementioned beta cells are mistakenly attacked as foreign bodies by the white blood cells. Essentially, the immune system is compromised (since the white blood cells work to safeguard the body's immunity).

Ultimately, the cells feel starved for calories they should be otherwise receiving from glucose. Some differences in symptoms include the fact that people with type 1 diabetes suffer from the following.


  • Irritability
  • Mood changes
Symptoms develop quickly, often within several weeks.

If hyperglycemia remains untreated (through insulin therapy) and since the body simply can not access energy from the circulating glucose, the body will seek energy from alternative sources like fat cells. Over the long term, the effect includes the following.


Type 2 Diabetes


People with type 2 diabetes produce insulin but can not use it effectively. 

In addition to contributing factors common between both types of diabetes, those more uniquely associated with type 2 diabetes include the following.
  • Overweight
  • a lot of belly fat
  • Inactivity
  • Prediabetes (ie a slightly evelated level of blood sugar)
  • gestational diabetes (ie diabetes during pregnancy)
  • delivery of a baby that weighted over 9 pounds
  • polycystic ovarian syndrom
Although the body initially attempts to compensate by overproducing insulin, this occurs to no avail and hyperglycemia occurs regardless.

Additionally, unlike type 1 diabetes, people suffering from type 2 diabetes may not have symptoms for several years. The symptoms develop slowly over time. Unfortunately, they may discover the disease only when complications develop.


However, a noteworthy difference is that, unlike type 1 diabetes (which is unpreventable for those predisposed to it), type 2 diabetes may be prevented and, in some cases, even reversed with the following livestyle choices.

  • Avoidance of overweight
  • Physical activity
  • A balanced diet, especially one that minimizes sugary and overly processed foods


Testing for Diabetes

The primary test for both types 1 and 2 of diabetes is the glycated hemoglobin (A1C) test. This involves drawing blood, usually with a small finger prick. The higher the blood sugar level, the greater the A1C level. A1C levels 6.5 and over indicate diabetes. 


CONTENT RELATED TO THE PANCREAS, INSULIN AND DIABETES.

Liver and Gall Bladder Flush

A liver and gall bladder flush may allow your body to permanently heal itself from many major illnesses. Since the root problem of numerous diseases relates to poor blood detoxification by the liver, removing gall stones and other toxins from the liver and gall bladder can resolve specific health problems and maintain overall good health.

Needless to say, a liver and gall bladder flush also allows you to painlessly resolve health problems without harmful drugs and or surgically removing the gall bladder (often because it has too many gall stones), The positive results commonly manifest within at least the first 3 rounds. 

Liver, gall bladder and pancreas are very closely connected. Consequently, a holistic approach that considers all of them is ideal. For instance, persons suffering with diabetes often suffer with some type of liver disease. [Image from PngTree.com] Put this article into context, get an introduction to the biliary system.


Among the most common signs and symptoms that have liver dysfunction as a key contributing factor include unexplained vision impairment, itching eyes, liver spots, unusual acne, new skin and or scalp problems (including rashes and forms of inflammation), dull headaches (especially if associated with nausea), a mild feeling of a hangover, heightened intolerance to alcohol, burping bitter matter, digestive issues (like feeling congested, intolerance to fatty foods, abdominal bloating, acid reflux, constipation, irritable bowel syndrome / IBS), heightened irritability, autoimmune diseases, Chronic fatigue syndrome, fibromyalgia, recurrent parasite infestations, blood sugar problems, sugar cravings. hormonal imbalances (as in the case of many women with liver spots). Furthermore, you may be predisposed to liver congestion and other problems if you have a history of using pharmaceutical drugs, pesticides, non-natural personal care products, strong cleaning chemicals, lots of hydrogenated food fats and the sugar-popular free sweetener called aspartame.

This post describes how one may do this flush.

To do this liver cleanse / liver and gall bladder flush, you will need the following
  • Pre-Flush
    • A source of malic acid. Malic acid will soften the gall stones in the liver which will ease the process of removing stones. For this reason, it is considered very useful for developing or maintaining a healthy liver to allow the body to heal itself and in turn protect itself against all types of disease (including diabetes). It is commonly found in fruits with a sour taste like apples (especially unripened apples) and sour tamarinds.
      • At least 32 oz of organic apple juice, apple cider vinegar and or enough apples to provide the equivalent for each of 6 days. Freshly juiced apples are ideal. 
      • malic acid capsules (for diabetics)
    • Enema or colonic. A colonic flushes the colon with higher volumes than most home-based enemas, is highly recommended for persons suffering from constipation or other digestive problems. Having at least an enema is highly recommended to avoid trapping gall stones in the colon which can re-toxify the body. Do not become complacent even if you have regular bowel movements because they do not necessarily indicate a completely unobstructed colon. Also consider ingredients that help to flush out parasites, especially if you are particularly concerned about parasites.
      • Coffee enemas are useful for detoxifying the liver. For instance, coffee opens the bile ducts and helps the liver to release toxins. 
      • Green tea enemas (However, use green tea in moderation if you have reason to avoid an "excess" in polyphenols as found in green tea supplements. One study suggests that such an "excess" may relate to liver toxicity).
      • Some enemas, like those with garlic or neem, are particularly useful for removing parasites. See the full instructions for doing an enema safely. Herbs like wormwood, regular cloves (from your kitchen cabinet) and black walnut are also very useful for removing parasites. Tackling parasites before this flush is essential if parasites are a particular concern.
    • If you have kidney concerns, a kidney cleanse is advisable. It usually involves herbs that include cat's claw, fennel seed, chicory herb, marshmellow root and so on. Also consider including cranberry juice which are especially beneficial to both the liver and kidneys. Celery juice is also very healthful for the kidneys.
    • Plenty of water
    • Meals that are whole foods, natural, low-fat and easy-to-digest or other useful consumption. Meals should be either heated or at room temperature. Most people do this liver flush after an ease-in period of 6 days. However, if you eat a standard Western diet (with lots of processed foods), consider extending this preparatory period with these whole foods.
      • very liver-friendly*** (and kidney-friendly**) foods like: 
        • apples *** ** (including unripe apples and apple cider vinegar) 
        • tamarinds *** ** (the sour variety)
        • cranberries ***  **
        • Others include beets*** , broccoli*** , cabbage*** , carrots*** , celery*** **, cherries*** , citrus juice**, cumin*** , fenugreek***, garlic*** , kale*** , mangoes, watermelon, tomatoes*** , wheatgrass*** **, turmeric*** , sweet peppers, broccoli. NB bitter herbs and vegetables help promote the liver's bile production (as well as the stomach's digestive acid secretion and pancreatic enzymes). They may be consumed before or during the earlier part of a meal. Among them include bitter melon, broccoli, dandelion greens, kale, okra, Sweedish bitters
      • malic acid capsules (an option for diabetics for whom fruits may not be ideal)
      • bulkier foods (hot oats, barley**, ideally without sugar; soy protein*** **, quinoa; plain brown rice seasoned only with sea or rock salt)
      • leafy greens
      • If you do not get enough protein from foods you eat, you might also produce insufficient L-ornithine (an amino acid that helps the body to remove waste). It is unclear to me. However, adequate vegan food sources of Lornithine might include soybean products like soy milk, shredded wheat, brown rice, pseudograin quinoa and the preparation and consumption methods. 
      • Avoid: animal products, alcohol, processed sugars, wheat, fried food and hard-to-digest foods like nuts. Also avoid food that is cold or chilled. Avoid overeating. Avoid supplements and vitamins and, if possible, medications so as to give the liver as easy a time as possible in its cleansing period.
  • Epsom salts solution (to give roughly 4 servings of roughly 3/4 cup each). Not only do Epsom salts relax and dilate the bile ducts to easily dislodge the stones but they also help to stimulate bowel movement to clear the colon. 
      • 4 tbsp Epsom salts (aka bitter salts or Magnesium Sulfate). Epsom salts help to dilate the bile ducts which in turn makes it easier for the body to release the stones. If you are somehow allergic to Epsom salts, a substitute is Magnesium Citrate at the same dosage.
      • 24 oz filtered water 
  • Flush (of olive oil and citrus juice)
    • Olive oil, extra virgin, cold pressed, 0.5 cup / 4 oz / 110g. Your body produces bile to metabolize oil that you consume. Consequently, this olive oil will prompt a large production of bile that flushes out the gall stones.
    • Citrus juice, freshly squeezed by hand and strained of pulp; grapefruit, ideally pink grapefruit OR a combination of orange and lemon, 6 oz / 0.7 cup / 170 g ie roughly 3/4 cup. That usually equates to about 1 large grapefruit or 2 small ones.
    • Optional. Anti-parasite ingredient.
      • a few cloves of garlic, crushed. Garlic helps to detoxify the liver.
      • drops of walnut tincture
    • A jar with a lid. Since the oil easily separates from the juice, you are likely to need to shake the mixture several times to homogenize the combination as you drink it.
  • Post-flush
    • Enema or colonic (same as above)
  • Time / timing
    • Since estrogen has been linked to constriction of the biliary ducts and gallbladder problems, women may consider doing this flush when their estrogen levels are as low as possible.
    • 6 days pre-flush
    • ideally 2 consecutive stress-free days at home
    • Ideally a new moon date for the flush da te. It is ideal to avoid the phase that is opposite to the new moon, ie the full moon because the body generally retains more liquid during the full moon period.
  • Optional: Natural relaxants like music. Some people find it hard to sleep at night on the night of the liver and gall bladder flush. Suggestions include the following.
    • relaxing music that will either play through the night or turn off automatically
    • A movie that can be programmed to turn off automatically

Steps for cleansing the liver / liver and gall bladder flush
  • PRE Liver & Gall Bladder Flush (for each of 6 days before the flush date)
    • 6 days before the flush date, consume malic acid (discussed above)  throughout the day. For instance, use just before and within the first 2 hours after meals, ie in addition to your usual intake of water (of usually 6-8 glasses of water at room temperature or warmed)
    • Eat whole foods meals as discussed above. 
    • Rinse your mouth out with a baking soda solution or plain water to protect your teeth from damage from the high acidity levels.
    • Get enemas or colonics to clear the colon and remove any congestion in the liver and colon. 
    • Consume lots of malic acid. See the ingredients above. 
      •  a week beforehand (and on the day of the liver cleanse), you can drink roughly 1 liter of organic apple juice daily throughout the day. Apple cider vinegar can also be used.
      • Alternatively, you can eat only apples throughout a day or two beforehand (and on the day of the liver cleanse). 
  • Liver & Gall Bladder Flush Day & Night
    • Unlike the previous 6 days during which you consumed the malic acid over the entire day, consume all of your day's quota of malic acid during the morning.
    • Optional. If you have trouble fasting on only apples and or apple juice, consider having a meal using the ingredients noted above. Hot oatmeal is ideal however. Avoid any type of fat (even in foods like coconut jelly, nuts, avocados and so on) as this may cause nausea during the flush.
    • Fast, ie using ONLY water after roughly 1:30 pm
    • From around 4 hours before bedtime, let's say 6 pm, prepare the pre-flush Epsom Salts solution.
    • Take the first of 4 doses of roughly 6oz (ie nearly 3/4 cup). To make it easier to drink this bitter solution, some people find it useful blocking the nose while swallowing. If you need, follow with a little citric juice, rinse out your mouth with water and or brush your teeth with baking soda to remove the bitter taste of the Epsom salts. 
    • Set your flush ingredients in a warm environment that will allow them to maintain a temperature that is room temperature or warmer.
    • By half hour before scheduled bedtime, let's say at 9:30 pm, you should already have noticed (loose) bowel movements from your first dose of the Epsom salts solution. If not, consider a water enema to remove any congestion in the colon. This is especially the case if you are outside of the post colonic or intensive enema period of roughly 2 days during which you might not have bowel movements.
    • Take another serving of the Epsom salts solution at roughly 2 hours after the first dose, let's say at around 8pm
    • Prepare your bed so you can lie immobile with you torso propped up comfortably above your abdominal region for at least 20 minutes. If necessary, prepare meditation music and other paraphernalia. Some people prepare a warm cloth to cover over liver region when you go to sleep, ie the upper right part of the abdominal region.
    • Optional. If you think you will have trouble sleeping, install your method of relaxation.
    • At bedtime, let's say about 10 pm, combine and drink the oil and citrus juice flush (see ingredients above) as quickly as possible and without interruption or, at least within 5 minutes. Drink this solution in the standing position. NB, if you have not yet had your first bowel movement, wait until immediately after that movement to drink this flush.
    • Immediately after drinking the citrus juice and oil mixture, lie immobile and in silence in bed on your right side and your knees as far up towards your head OR on your back with your torso propped up above your abdomen for at least 20 minutes. After the initial 20 minutes, you may return to your usual sleeping position, other than on your stomach. You may feel small, painless movements in your liver as the stones become dislodged. 
    • Avoid drinking water within 2 hours after taking the oil and citrus flush.
    • If you feel nauseous, consider taking apple cider vinegar in very little water. 
    • Remain in bed for the entire night other than when you need to use the toilet
  • POST Liver & Gall Bladder Flush - The morning and day after
    • NB throughout the day, you may drink water if you are thirsty. However, do not drink water immediately after drinking the Epsom salts.
    • The next morning, at roughly (but not before) 6 am, drink another dose of the Epsom salts solution. You may return to bed if you wish. However, it is best to remain in an upright position after this point.
    • Roughly 2 hours after the first dose of Epsom salts solution for the morning, ie at 8am, take the last dose of Epsom salts.
    • You are likely to begin to evacuate green or gray stones the size of coffee grounds. If you had been fasting and using enemas or colonics, you are likely to pass nothing other than the stones. If you do not see stones and especially if this is your first few times, continue the process regardless. Some people do not begin to pass stones until during their first 2 or 3 flushes.
    • Roughly 2 hours after the last dose (let's say at roughly 10 am), introduce fresh fruit juices back into your diet. 
    • During the course of the day, your body is likely to continue to release stones that are progressively harder, darker, heavier and bigger. Although everyone is different, you may see the following. Regarding the hypothesis that the stones are simply a combination of the flush ingredients and bile, this appears unlikely in part because the volume of stones often exceed the oil and other flush ingredients. Additionally, as seen below, the stones do not always or only have a color similar to that of bile.
      • In the afternoon after the oil mixture; watery bowel movements that consist of gall stones and food residue, then stones with only water.
      • The stones are usually green and shiny because of the bile compounds. Lighter colored stones are the newest while darker colored green stones are oldest.
      • Some stones formed as a regrouping of several small ones. 
      • Some stones have a bacterial clump? in their center. One likelihood is that the stone was formed as a result of bits of dead parasites, viruses and cysts passing through the liver. 
      • Most stones are no larger than a kernel of corn. However, some may be as large as golf balls.
      • Heavier, calcified stones are usually white or tan colored and sink to the bottom of the toilet. They usually come from the gall bladder and usually contain heavier, toxic substances. 
      • Foam. Foam consists of millions of tiny sharp-edged cholesterol crystals
    • You may begin to introduce foods that are very easy to digest like soft fresh fruits. Consult the list of whole foods above.
    • Rest to give your body a chance to recover
    • Roughly 2 days after the flush, perform colonics or enemas that may flush out any remaining toxic stones from your colon.
    • Repeat this process as required with the aim of performing flushes without stones over 2 consecutive flushes. Most people achieve this after roughly 12 or more flushes. It may be unsafe to avoid repeats of this process, specifically because of concerns of leaving un-flushed toxins in the body. Additionally stones that are lodged deeper in the liver may also begin to move forward in preparation for a subsequent flush.
      • When first addressing liver toxicity problems, some people repeat this process as frequently as once weekly or fortnightly, then less frequently. 
      • Persons doing the process routinely and without serious liver toxicity may repeat the process once every 3 weeks. 
  • If you have kidney concerns, a kidney cleanse is advisable.


CONTENT RELATED TO LIVER & GALL BLADDER FLUSH
  • The biliary system 101. Learn about the liver, gall bladder, gallstones and more.
  • This post and many proponents of the cleansing the liver and gall bladder have been inspired by the must-read book 'The Amazing Liver and Gall Bladder Flush' by Andreas Moritz.
  • Read how to prepare barley water to enhance kidney function 
  • Caring for the liver helps to protect against diabetes. Learn about the pancreas, insulin and diabetes.
  • This is how to make fresh, unsweetened tamarind juice 
    • Select roughly 10 large ripe tamarinds (the original sour, NOT sweet variety)
    • Remove the outter shell and place the bulb into a container of roughly 4 cups of warm filtered water
    • Vigorously shake to help dissolve the pulp away from the seeds and into the water
    • Allow to stand for roughly 1 to 2 hours during which you can shake the mixture further
    • Strain away the seeds and bits
    • Drink this tamarind water throughout the day
  • A step-by-step guide to full body cleanse
  • How to do a vaginal douche

Agar Agar a medicinal super food

Agar agar, aka kanten, seaweed gelatin, China grass, sea vegetable gelatin (gelatina vegetal). Agar agar is a sea weed extract that is mostly found in health food stores and supermarkets, especially Asian supermarkets in a white powder or thread form. The thread form looks like translucent plastic threads. Agar agar is also used as a vegan substitute for gelatin. 
-- --
Uses of Agar Agar
  • Medicinally, agar has several applications. For instance, it is used as a mild laxative that can help in removing toxins, fats and sugar from the gut. Since it absorbs glucose from the stomach and passes through the gut quickly, agar agar is ideal for people with type 2 diabetes melitus. Additionally, it also absorbs cholesterol and is therefore good for lowering cholesterol. In fact, agar agar is even used as a more effective and vegan substitute for gelatin for treating bone, cartilage and joint damage. In fact, its use can prevent the need for operations like hip and knee replacement. Since it helps to regenerate tissue and organs, agar agar is even repairs kidney and heart damage. In fact, it is simply useful in the treatment of all diseases and injuries, including heart disease, cancer, Alzheimers and Parkinsons disease. Since agar agar can contribute to the reversal of any disease (and improvement of one's general health), its use may contribute to not needing / avoiding stem cell transplants (a common treatment for some types of cancer). Yes, it is also good estrogen-dependent cancers like breast cancer, ovarian tumors and uterine cancer. It is common for medical use to involve one serving daily for up to 2 months, 30 minutes before meals or 2 hours after meals. However, do NOT use agar agar if you have viral or bacterial infections (as it promotes microbial growth).
  • For weight loss and as a high fiber, vegan health food in ice cream, jelly desserts, meal replacement recipes, 'milk' thickeners and so on. As with any other algae, it is rich in iodine and trace minerals. It is often used for weight loss because it is free of sugar, carbs, fat and calories but has lots of fiber. Furthermore, agar agar is free from starch, soy, corn, gluten, yeast, wheat, milk, egg and preservatives. Agar allows you to create solid forms from liquids to the extent that the end product may be sliced with a knife, chewed and swallowed. Although having 0 calories, it has a slightly sweet taste. Although the taste of end products can be the same as gelatin (an animal product), agar agar renders end products with a different feel. For instance, agar agar products do not have the same soft and bouncy feeling as gelatin. Agar agar is commonly used to thicken soups, ice creams and to create fruit desserts. NB, Agar agar is free of taste, odor or color. NB it will not set in certain conditions, namely in wine, vinegar, distilled water, foods rich in oxalic acid (like chocolate, spinach, beets, beet greens, wheat germ, peanuts).
  • Cosmetically, agar agar can be used to soften and moisturize the skin and hair. It can therefore be used in soap, ointments, lotions and creams, especially since it has anti-wrinkling properties. It has been said to be used in toothpaste.


Agar Agar in Powder Form
Quantity to use is roughly 1 tsp powder : 1.3 cups liquid for a sold product that can be cut with a knife.
  • Add the powder to only cold water or other clear liquid that allows you to see how well it dissolves. (It will form clumps if added to hot water). 
  • Whisk and bring to a boil until the powder is completely dissolved. Check whether the agar agar has completely dissolved by looking at the solution while it pours out of a spoon. 
  • Continue whisking until the end to ensure the agar agar does not settle and create a gel layer at the bottom of the pot.
  • Dissolve sugar if you wish the sweet taste. 
  • Turn off the heat and quickly add fruit puree (and lime to taste if you wish), tea, milk and or juice. 
  • Pour into the mold while still hot. Get rid of air bubbles before the liquid cools and sets by stirring around them with a spoon and or tapping the bottom of a firm mold on a hard surface. 
  • Add chunks of fruit and pieces of leaves (like mint for instance). 
  • Allow to set either at room temperature or in the refrigerator. (Unlike gelatin, agar agar does not need to be refrigerated in order to set). If you wish to pour different layers, use a fork to stick holes in the first layer when it has already fully set before pouring the second layer. Do not worry about melting the first layer since agar agar does not melt easily with heat.

-- --

Agar Agar in Strand Form
Quantity to use is roughly 1/3 cup of chopped up strands : 1.3 cups liquid for a sold product that can be cut with a knife.
  • Soak the strands in cold water or  other clear liquid that allows you to see how well it dissolves for 15 minutes. 
  • When soft and hydrated, simmer for roughly 5 minutes or until the pieces are completely dissolved.
  • Follow the steps used for the powder form after the powder is thoroughly dissolved in hot liquid. (See above)


-- --
MORE RELATED TO AGAR AGAR AS A MEDICINAL SUPER FOOD

How to do a colon cleanse with aloe vera

How to do a colon cleanse with aloe vera

USES & BENEFITS OF A COLON CLEANSE WITH ALOE VERA:
  • Aloe vera is a safe way of cleaning the gastrointestinal tract. It flushes out toxic fecal accumulation that had built up over years.
  • It heals and rebuilds the cells in the gastrointestinal tract while cleaning
  • It rids the digestive gastrointestinal tract of excesses in harmful flora like yeast and unfriendly bacteria
  • Before her naturopathic journey, Miss C had had “low enzyme activity”. Her naturopathic doctor prescribed aloe vera juice which helped with that. With greater enzymes activity, food can change chemically so that we could absorb their nutrients.
  • -- --
  • Ultimately, cleaning the gastrointestinal tract improves how well it functions. For instance, toxic build up will no longer prevent your body from absorbing the nutrients that you eat
  • Good for occasional use to treat digestive problems like constipation
  • Other health giving side effects: It is nutritional. Specifically, it provides many vitamins that include A, various types of B, C and E. It also provides minerals that include calcium, magnesium and zinc. It also improves immunity, metabolism, blood oxygenation and the production of antibodies to fight diseases. These benefits are largely attributed to its many health giving amino acids. It provides overall good health not only since a cleaner body is better able to heal and maintain itself but also because it is an adaptogenic (ie it regulates the body's systems). For example, whether you suffer from high or low blood pressure, aloe vera regulates it to normal, healthy levels. Furthermore, you look and feel better. You may lose excess weight, lower blood sugar in the body, get less headaches, get healthier skin and hair. It fights and prevents viral infections that, among other things include the common cold.
 
TO DO A COLON CLEANSE WITH ALOE VERA, YOU WILL NEED:
  • An aloe vera leaf (the more mature, the better)
We prefer getting the leaf from the plant over using the commercial type. There is added value in eating something that we cut only a few minutes earlier. To our knowledge, commercial aloe vera is mostly pasteurized and can lose some of its nutritional. We also wonder about the method of transportation to market and storage periods. Please let us know your thoughts on this matter.
  • Lemonade or orange juice
The sweetness of the juice is useful for eliminating the natural bitter taste of the aloe vera
  • Cling wrap (optional)


INSTRUCTIONS FOR DOING A COLON CLEANSE WITH ALOE VERA:
  • Ensure that the juice is sufficiently sweet and set it aside. Adjust the sweetness according to taste.
  • Cut off the piece of the aloe vera leaf that you will use. When you start, you may start with about 2-3 cm. Over time, increase this quantity. Your tolerance for the bitterness of natural aloe vera will increase in time and you may not need the juice to be too sweet.
  • Wash the skin of the leaf thoroughly with a dedicated food sponge
  • Remove the sharp thorny side edges
  • Rinse the piece of aloe vera with cold water to remove any excess gel
  • Add the aloe vera to the juice in one of several ways: (1) Blend it. However, you are more likely to taste the bitterness of the natural aloe vera gel; (2) If you are new to this, you may remove the skin. Cut the aloe vera gel into tiny pieces and add those pieces of aloe vera into the juice without stirring. Rather than throw away the skins, you can rub the inside part of the skin over your face as a moisturizer; (3) After getting used to taking aloe vera, chop up the aloe vera into as tiny pieces as possible with the skin still intact. Note that, if you leave the skin on, the purging effect can be stronger. Add the tiny pieces of aloe vera into the juice without stirring.
  • -- --
  • Drink the juice
  • Place the remainder of aloe vera in a container that can support it in a vertical position where the cut side is upwards. The cut section may start to heal and seal off the gel inside within a few minutes. However, if the leaf is extremely succulent and not healing as quickly, you may also cover the exposed section with a piece of cling wrap that is large enough to seal the cut.
  • Feel free to continue to use aloe vera gel routinely even after the cleanse period.


OTHER CONTENT RELATED TO COLON CLEANSES WITH ALOE VERA
Take Control! Click HERE to subscribe to our YouTube channel (Naturopathic Control)