Showing posts with label Recipe. Show all posts

Vegan Gluten Free Christmas Cake

Vegan Gluten Free Christmas Cake

Although I do not celebrate Christmas, I found myself making a last minute decision to use whatever ingredients were already in the kitchen to bake this gluten-free, vegan cake. I thought I'd share the recipe since I like the results and will definitely repeat this recipe because the taste is comparable with that of the original version of the traditional West Indian fruit cake, used for Caribbean weddings and Christmas gatherings.


Things you need to make vegan gluten-free Christmas cake

  • 3/4 cups fruit. I only had raisins on hand and came up with the idea for 2 other 'fruity' ingredients. I chopped up the rind of a few organic tangerines I had bought locally. I crudely grated about 1/2 cup of partly cooked beet root.
-- --
  • 1/4 cup rum. Aged brown rum is ideal because it imparts flavor and character. However, I only had left over white rum that I had bought for a tincture. Surprisingly, it worked fine but still not my first choice.
  • 1/2 cup fat. I use oil, preferably virgin coconut oil if it is available and suits you health wise. Coconut oil is very healthful in most cases. However, I used sunflower oil because, this unplanned baking session caught me without coconut oil. Besides, one companion who will eat the cake has blood type B (for which coconut oil is not advisable).
  • 1/4 cup brown sugar
  • 1/4 cup nuts or nutty ingredients. I used the crunchy version of Smucker's natural crunchy peanut butter. I mix peanut or any other type of butter with the wet ingredients. When I want to avoid nuts as a consideration for people with nut allergies, I use roast and crudely chop sunflower seeds. They actually taste like peanuts. I mix the sunflower seeds with the dry ingredients.
  • Egg substitute equivalent to 2 eggs. I nickname this ingredient 'vegg'. I used my flaxseed recipe. However, this time, I chose not to strain off the whole flaxseeds. It just so happened that I baked yesterday and after straining off the cooked flaxseeds I used for making a thick gel, I placed the seeds in the refrigerator. To my pleasant surprise, the seeds are chewable with a nice crunch. So I've decided to re-use those flaxseeds to make a new batch of egg substitute along with the whole seeds for their crunchy texture.
  • 1/8 tsp baking soda
  • 1 tsp white vinegar
  • 1/4 tsp cinnamon
  • 1/2 cup oatmeal as a gluten-free substitute for wheat flour
  • 1/4 cup rum. This is additional rum to pour over the cake after it has cooled from the oven. If you have a limited amount of good aged rum, reserve it for post-baking 
  • baking pan
  • 6 tbsp browning
  • baking pan. I doubled this recipe and found a square 8 by 2 inch pan worked perfectly


Steps for making vegan gluten-free Christmas cake

  • Soak the fruit in the 1st of the 2 batches of rum for at least 24 hours.
  • Preheat the oven to roughly 300 degrees F
  • Grease the baking pan
  • Combine the fat, sugar, vegg and other wet ingredients
  • Combine the dry ingredients as homogenuously as possible
  • Bake in the preheated over for roughly 45 minutes
  • Allow to cool
  • Spread the balance of the rum over the cake 

-- --


Corn Tortillas: Simple Gluten Free Bread Substitute

Corn tortillas are a round and flexible corn-based bread that is highly economical and fast to prepare. Some health benefits include the fact that corn tortillas are free of gluten and cholesterol. Although it is typically used to wrap Latin foods like spinach stir fries (like zorrillo, etc), grounded beans with culantro and chunks of avocado, they may also be used for many creative dishes (like rolling my papaya salad). 
How to make corn tortilla - gluten free bread recipe
Corn Tortillas: Quick & Simple Gluten Free Bread Substitute

To make corn tortillas at home as a gluten free bread substitute, you will need
  • A mixing bowl (If you are using a pot as a press, use the pot as a mixing bowl to use fewer kitchen wares) 
  • Masa de maiz cascado (crushed corn flour. The label of this flour may speak of the flour being ideal for tamal / tamale, a steamed dish). You may use either the white or yellow type. However, the taste and texture differ slightly. The white type is more pliable while and tastes more like regular wheat flour while the yellow corn flour is more gritty. 
    Corn Tortillas: Simple Gluten Free Bread Substitute
  • Pinch of salt or to taste 
  • Water  -- --
  • Spoon (for mixing) 
  • A surface that is firm and flat 
  • A plastic bag with one or both side(s) slit completely open as shown in the images below OR 2 pieces of plastic 
  • a tortilla press OR a saucepan 
  • flat non-stock cookware  Oil (for frying) 
  • cotton ball for spreading the oil on the cookware
  • A tiny saucer to hold a little oil for coating the pan between tortillas
  • a heat source from the bottom (like a stove top) 
  • spatula (for flipping the tortilla) 


How to make corn tortillas as a gluten free bread substitute at home:
  1. Pour the masa de maiz cascado to a bowl 
  2. Alternate between gradually adding (more) water to the masa de maiz cascado and thoroughly mixing (with a spoon). Continue mixing until all the water is absorbed into the masa de maiz cascado into a soft ball. The ball should feel like a ball of mashed potatoes.            
  3. Create discs that are roughly 0.5 inches thick and 2 inches wide 
  4. Place a disc onto one sheet of plastic onto the flat surface (like a kitchen counter or the inside of a tortilla press) and cover it with the next so that the 2 sheets of plastic sandwich the disc
    Corn Tortillas: Simple Gluten Free Bread Substitute - recipe instructions
     
  5. Gently press on top of the top sheet of plastic with the saucepan until the tortilla spreads out to a diameter of roughly 4 inches 
      
      
  6. Press down on the tortilla dough with your fingers to flatten the tortilla further. This will improve its ability to fold without splitting. 
    Corn Tortillas: Simple Gluten Free Bread Substitute - recipe
  7. Soak the cotton ball with oil and use the cotton ball to spread a thin layer of oil over the inner surface of the cooking ware. -- --
  8. Turn on the fire to a low to medium setting 
    Corn Tortillas: Simple Gluten Free Bread Substitute
    The heat is so low in this photo that it is hard to see the flame. For a pan that does not have a non-stick surface, heat the pan very well before applying the oil. The tortillas will not stick if the pan and oil are very hot.
  9. Peel away the top sheet of plastic. 
  10. Place the raw corn tortilla into the palm of your dominant hand.
  11. With the non-dominant hand, gently peel away the other sheet of plastic from the tortilla (so that the tortilla is in the palm of your hand). 
  12. In a quick movement, slap the tortilla onto the hot cooking surface
  13. Within a few seconds, shift the corn tortilla around within the pan (to prevent it from sticking)
  14. Flip the tortilla a few times when it holds together and assumes a slightly drier look. In some cases, a few dark spots may occur on one or both sides where the tortilla got extra heat. Stack the tortillas onto a plate 
  15. To store, place the tortillas in a sealed plastic bag in the refrigerator for up to roughly 3 days. 
  16. To heat cold tortillas, cook in a microwave oven for a few seconds, roughly 20 seconds or until warm
--
--
RELATED TO CORN TORTILLAS AS A SIMPLE GLUTEN FREE BREAD SUBSTITUTE

Gluten Free Pumpkin Cake

To make gluten free pumpkin cake, you will need:
Dry Ingredients

  • 2.5 cups of corn flour (suitable for tamales) or gluten free oat flour
  • 1.25 cups brown cane sugar  (This recipe also works with ripe bananas. If you use bananas, use roughly 0.75 to 1 cup of sugar to compensate for the natural sweetness of the bananas)
  • 2 tsp baking powder
  • 2 tsp cinnamon
  • 0.5 cup nuts, carrots and or raisins (optional. However, remember that the cake will have whole flaxseeds that will render a mildly crunchy texture without the addition of this option.)

-- -- 
Wet ingredients

  • flaxseed unstrained gel from whole seeds, mildly cooked until a thick gel forms to make the vegan equivalent of 4 eggs (See recipe for making a vegan substitute for eggs). If you wish, you may strain the seeds. However, the slightly cooked seeds render a lovely mildly crunchy texture
  • 1 cup oil (coconut oil or other vegetable oil like sunflower will do)
  • 1.5 cups pumpkin, cooked and mashed (This recipe also works with ripe bananas)
  • 1 tsp annatto powder (optional for color)
  • 0.5 cups water


This is how to make gluten free pumpkin cake

  1. Preheat the oven
  2. Combine all the wet and dry ingredients in separate bowls
  3. Add the combined wet and dry ingredients until homogenously mixed
  4. Coat the baking pan with oil and pour the batter
  5. Bake at roughly 150 degrees C for roughly 35 minutes or until a fork emerges clean from the cake while still baking in the oven


-- --
-- -- 
RELATED TO MAKING GLUTEN FREE PUMPKIN CAKE

Green Papaya Salad to Improve Enzyme Activity & Digestion

Green papaya / pawpaw salad ('som tum') can help to promote enzyme activity and, by extension, digestive health. Although digestion is my main attraction to this recipe, I am delighted by its additional health benefits that include internal cleansing. From my understanding, this cleansing benefit is heightened by the addition of cayenne pepper and citrus juice. The papaya - pepper - citrus combination has been used for years in countryside herbalism as part of a cleansing regime.
-- --
There are so many variations to this recipe. However, below is how I have done it.

  1. Select a very firm green papaya. There should be no yellow or soft spots. In other words, the inside of the papaya should be white.
  2. Peel the green papaya
  3. Julien the green papaya to make roughly 8 oz of papaya. If you do not have a food processor or mandalin, you can also try the traditional Thai method. In Thailand, they repeatedly hit a side of the green papaya in random spots around a single area with a sharp chopping knife. Afterwards, they slice off that section to get Julien slices. You may even use a potato peeler to slice off the Julien strips after hitting the side of the green papaya with a knife. -- --
  4. Chop, combine and mash together the dressing ingredients. A mortar and pestle are usually used to combine the flavours.
--
--
  • garlic, to taste

  • dried shrimp, salted crab and or their pastes, to taste (for non-vegans).

  • hot cayenne peppers, to taste

Add and stir in the following ingredients until the sugar is well dissolved.

  • brown sugar, to taste

  • lime juice, roughly 1 lime or to taste

  • fish sauce, to taste (for non-vegans)

Add the green papaya shortly before serving. Other optional additions include the following.
Take Control! Click HERE to subscribe to our YouTube channel (Naturopathic Control) 


  • Crunchy yard long beans

  • cherry tomatoes

  • shredded carrots

  • crunchy raw Jamaican ackees, cubed

  • peanuts

While this salad is traditionally eaten with sticky rice, I generally eat it alone because it is surprisingly very filling. Besides, I realize that my challenges with digestion have been alleviated by not eating until I became bloated and heavy. 


CONTENT RELATED TO USING GREEN PAPAYA SALAD TO IMPROVE ENZYME ACTIVITY FOR BETTER DIGESTIVE HEALTH

Sprouting 101: Demo Lentil Sprouts

Sprouts are the first sign of the germination in water of nuts, grains or seeds. They are usually tiny off shoots before established leaves develop. Depending on the seed, sprouts usually reach this stage of development within 2 to 5 days. (Lentils usually take between 2 to 3 days).
 Naturopathic Control: Sprouting 101 with Lentil Sprouts

Uses of Sprouts

  • Medicinal (see below the specific benefits associated with sprouting certain seeds)
  • Ingredient in salads, soup, stir fry and other meal options when doing the naturopathic cleansing program  
  • Part of a ferment (like sauerkraut)


Benefits of Sprouting

  • Makes nutrients and enzymes more available for digestion than is possible from the seed, grain or nut.
  • Easier to digest than the seed. Sprouting avoids the ‘anti-nutrients’ (ie substances like phytic acid that disrupt the body’s absorption of nutrients and enzymes) in the nuts, seeds and grains. Soaking, the preliminary component of sprouting, reduces anti-nutrients by as much as 90% or more within only one day. This benefit is especially noteworthy for people suffering from digestive and or autoimmune problems. In that case, the flatulence caused by lentils for instance may be eradicated by sprouting.
  • Easy to do in your kitchen, even if it is dark; inexpensive, its need for space is limited to only a jar or small container
  • Sprouting can be done with numerous other seeds that include alfalfa, amaranth, arugula, broccoli, buckwheat, cabbage, channa, fenugreek, kale, millet, mung, pumpkin, raddish, quinoa, sesame seeds, snow peas, sunflower (un-hulled), tef and wheat grass. In fact, you can choose among these seeds according to your health (or other) objectives. For instance, fenugreek is among the best for detoxification; most alkalinizing sprouts include those from amaranth, millet, quinoa and tef; most nutritionally dense sprouts include arugula, alfalfa broccoli, cabbage, kale and raddish; brocoli for thyroid and cancer-related problems; sunflower for protein, phytosterols, essential fatty acids and fiber; sesame seeds for protein and moderate amounts of manganese and copper; and alfalfa for vitamins C, K and B and to balance cholesterol and support the immune system (BUT controversial since they have canavanine that can inhibit the immune system). When choosing, consider the ease of sprouting the different seeds. For instance, chia, hemp and flax seeds are arguably difficult to sprout (but better for making microgreens). There are however some seeds that should not be sprouted. For instance, do NOT sprout red kidney beans (because they contain a toxic compound in their sprouts. Having said this, they are safe to be cooked after being soaked.

Sprouting Challenges

The seed can sometimes carry bacteria that cause food borne illness. In fact, they had been connected to outbreaks of salmonella and E-coli. This is especially possible if care is not taken to properly sterilize implements and hands in the germination process. Outside of sterilization, you may avoid this problem by soaking sprouts in 1:6, ie lemon juice: water solution for 15 minutes before eating sprouts. This will kill bacteria in the sprouts.

Take Control! Click HERE to subscribe to our YouTube channel 


How to Sprout Lentils
You will need:
  • Organic lentil seeds. You can get these at supermarkets and or health food stores. A friend left a store empty handed when she asked for ‘sprouting seeds’. Simply ask for ‘lentil seeds’.
  • A large glass jar with a screened ‘cover’ top (which may be a screen held in place with a rubber band)  OR  For larger volumes, a colander that fits perfectly into a solid bowl. Ideally the colander should be flat bottomed
  • Sterilizing equipment. I used a cotton wool soaked with surgical alcohol or vinegar that I rinse out with filtered water
  • Filtered water
  • Light kitchen towel or paper towels
  • Lemon as an option. You will need 1 part lemon juice to 6 parts water to soak the sprouts just before eating them. This is a technique used to ensure any bacteria are killed

Steps for Sprouting Lentils

  1. For a sprouting container of roughly 32 oz that you will grow over 3 days, 2 tbsp of seeds will suffice.

  2. Soak the seeds for 24 hours in water in any sterilized bowl. Since the seeds will expand, ensure the water level is at least 3 times higher than that of the seeds. The bowl may (not) be covered. (Some seeds require less soaking time. For instance, fenugreek seeds may require 12 hours while alfalfa seeds may require only 8 hours). 

  3. Drain off the water very well. The image below shows a bad batch of fenugreek seeds that frothed. They had not been washed and drained well. Attempts to clear up the froth with lemon juice minimized the frothing but did not encourage growth on this day 4. fenugreek sprouts gone wrong
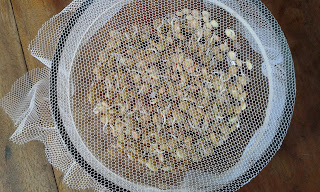
  4. Spread the seeds out into the sprout container (ie the colander or jar) and place the colander into the big bowl. Throughout the sprouting process, handle the sprouts as little as possible. In that case, spread the sprouts by gently shaking the sprout container in which they are contained
  5. Water the seeds. To do this, submerge the seeds with a new batch of water for a few minutes. In the case of the colander and bowl, place the colander into the bowl and pour water over the sprouts until they are submerged. Otherwise, pour water into the jar.
  6. Shake gently. Shaking is a means of rinsing the seeds to ensure mold or bacteria do not form.
  7. Drain the water out (so the seeds are no longer submerged or in direct contact with water). For the colander, drain out the water from the bowl below the colander so the colander could drip dry any excess over time into the bowl. Otherwise, you can tilt screened glass jars upside down to drain out the water before sitting the jar on its side. Laying the jar on its side also extends the surface area of the lentils. -- --
  8. Cover with a light kitchen towel or even paper towel. Either way, ensure that the seeds get air circulation between each watering. This is in part to prevent molding.
  9. Water the seeds twice daily before covering with a towel. Other kinds of seeds may require more frequent watering. You will need to monitor how dry they look to determine whether they need to be watered again.
  10. After the seeds germinate and the sprouts lengthen, some seeds may become dislodged. Remove these seeds by placing the batch into a bowl of water and then skimming off the seeds.
  11.  You may eat the sprouts from day 3. However, you may eat the sprouts later if you want a less crunchy texture.         Naturopathic Control: Sprouting 101 with Lentils 
  12. Naturopathic Control: Sprouting 101 with Lentils
    Naturopathic Control: Sprouting 101 with Lentils
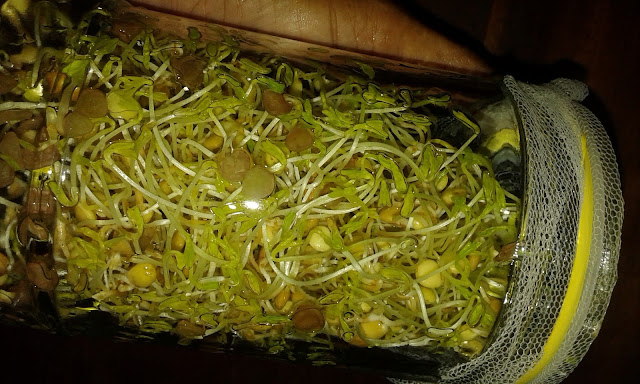
  13.  In the image below, the sprouts were left for 10 days, ie well beyond the normal period. They are edible even after this extended time period.


  14. Naturopathic Control: Sprouting 101 with Lentils
      If you wish to eat the sprouts later rather than sooner, you may place them close to a source of indirect sunlight for a slightly greener result. However, the color does not affect the difference in taste.
  15. To harvest, place all the sprouts into a large bowl of filtered water. Gently shake and detangle the sprouts. The seeds will fall away. Scoop away the seeds and place in your compost bin while leaving the sprouts for your food.

DIY Sprouting 101: Lentil Sprouts
If I want to store sprouts and stop their further growth, I place them in a container in the refrigerator. 
-- -- __
CONTENT RELATED TO SPROUTING